
For this exercise, I recorded the shots from the objective POV of an alcoholic looking for a drink. As I was using a different actor this time, I decided to change the story a bit and take advantage of the possibilities that an objective POV allows. I kept to the same location (kitchen and living room) but re-arranged where the man would be standing so that I could shoot across a kitchen table as he poured his drink (its the same drink :-)). The other major change was the inclusion of a second actor as a distraction. I was not sure if we could include dialogue in this exercise, but I decided it was such a short dialogue that I would include it. I also wanted to keep it because I felt it contributed something extra to the meaning/impact of someone being an alcoholic. In the previous exercise I had tried to introduce the idea of a ‘happy’ alcoholic but I don’t think it worked as well as I had hoped, so for this sequence, I would keep the mood serious.
And this is the edited sequence:
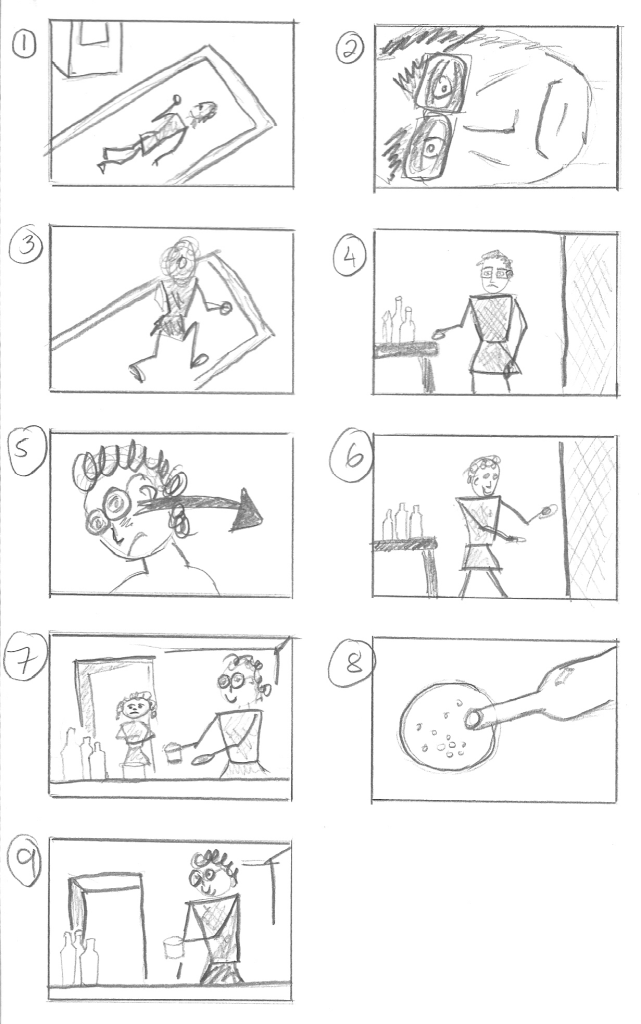
This is the original storyboard, which I greatly simplified. The objective was to make a storyboard that was simply a tool for recording the shots and showing what would be required in the shot. In previous exercises I had spent a considerable amount of time on the storyboard only to realise that a lot of the effort was unnecessary:
Analysis:
Overall, I am happier with this sequence that the subjective POV sequence completed earlier in the course.
I had set up two additional, specific objectives for myself in this sequence:
- Include high and low angles to show meaning
- Creating the feeling of continuity of movement between some of the cuts
To varying degrees I achieved this. I will elaborate further in the text below.
Shot 1: Man lying on floor
This HA shot is intended to a) set the scene and provide information about the location, and b) show the alcoholic in a diminished, weak position. Not only is he lying on the floor but viewed from a high angle was also intended to convey his weakness. I climbed up onto a ladder and shot from as high as I could manage. The intention was also be to show a slightly canted angle to convey a bit of disorientation.
My only difficulty with this shot is that it is too short. It would have benefitted from a couple more seconds so that the viewer could have a better look around but I didn’t have more footage of him lying still. What was behind this, is that in some of the videos of this sequence by previous students, there are long pauses in the shots and they sometimes felt too long. I wanted the pace of my sequence to be a bit faster.
Shot 2: Close up of man waking up
This close up was intended to focus on the man as he came awake and show that he is a bit hung over. The close up allows a bit of beard stubble, giving the impression that he has been on the floor sleeping for most of the night. I think this shot works because I always feel a bit uncomfortable when I look at it – as if I’ve moved too close into the personal space of the actor (in truth he was a very cooperative person :-)).
As the man gets up, the camera refocused on the bottom of the couch and the blinds. I’m not sure why – but I decided to keep this in instead of an earlier cut. I really don’t understand why it works, but it does – maybe it is the blandness of the scene that helps give the feeling of emptiness that alcoholics feel. It certainly wasn’t intentionally filmed that way.
Shot 3: Getting up and walking to the table
This is a simple continuity of movement shot taken from a HA to show the alcoholic again in his diminished position. It’s a quick shot but any longer would have been redundant. It sets up the cut to the next shot.
Shot 4: Walking to the table and looking at the empty bottles
This shot is a continuation of the movement from the previous shot and I think the cut is in the right place as the movement is relatively smooth. The camera angle is now low, with the viewer looking up at the alcoholic. The idea was to try to convey that he is coming awake and growing more determined to find the next drink. The low angle is intended to give the sense that his will to do this is strong.
One of the frustrating parts of this shot was that I wanted to set the depth of field (DOF) so that only the man was in focus with the background blurred out, but I could not move far back enough to create this effect (there was a kitchen wall in the way!)
Shot 5: Rubbing his eyes and spitting the drink
This is another low angle close up shot that focusses the viewer on how hung-over the person is and yet still with the determination to find another drink. I am about 80% happy with this shot – the close up shows good facial expression. The 20% I am not happy with is the composition. I wanted the person to be in the left third of the frame because I knew he was going to look to the right of the frame, and in the following shot walk towards the right of the frame and I wanted to give him space to do this. However, by keeping him in the left part of the frame the ceiling light behind his head disturbed the composition and at one moment it looks as if the light is sticking out of his head. If I could reshoot this, I would move my actor to a different part of the kitchen where the light is out of frame.
Shot 6: Walking to the drinks
This is another quick continuity shot that blends with the movement of the previous shot. I was happy with the flow of these two shots. I kept the camera angle low to be consistent with the Shot 4. In practice, shot 4 and 6 were one recording and shot 5 was inserted in the middle.
Shot 7: Pouring the drink and the distraction
This was the longest shot. The person is starting to pour the drink, gets distracted and then continues to pour the drink. The shot is at a slightly low angle; this was not so much for effect but rather because it was the best way I could get everything in the frame that I needed to get in the frame and still look compositionally balanced. In terms of improvement, I would have preferred to be able to adjust the DOF so that the viewer first focussed on the man and then the girl as she walks in through the door, but at this stage I can’t seem to manage it. I think this is because I am not able to get far enough away from the scene to adjust the DOF enough. The most significant error with this shot is the transition from shot 6 to shot 7 as I crossed the 180 degree rule and it could be disorientating for the viewer. To correct this – I broke with the continuity and faded out after Shot 6. So when Shot 7 appears, the man is already at the table and look to pour the drink.
Shot 8: Pouring the drink
This is my favourite shot and I have been wanting to use this for ages. I saw it in a movie a while ago and whilst I can’t remember which movie it was, I can remember how pouring the drink was filmed. Be that as it may, the very low angle (sort a reverse of a birds eye view) is intended to completely focus the viewer on the drink. Taken from this angle looking up, the intention is to blatantly give the drink the power that it so clearly has over an alcoholic.
Shot 9: Taking the drink
This final shot is at the same angle as shot 7 to maintain continuity. I faded to black at the end with it (hopefully) clear that the man took the drink. Since it was rather early in the morning again, actually having the drink would have been a request too far for my actor.
Lessons learnt:
- The high and low angles mostly achieve the desired effects but sometimes they are simply tools for composition.
- Its important to decide first what effect or what meaning you are trying to achieve before deciding which camera angle to use. All the tools (lighting, camera shots and angles, colour, composition, etc.) should support the meaning, not the other way around.
- Pay attention to not breaking the 180 degree rule – I think everyone has to do this at least once to learn from it :-).
- Storyboards need only contain what is necessary to record the shot. They do not need to be over-detailed or masterpieces that take a lot of unnecessary time to prepare.
- Creating a flow from one cut to the next, when only one camera is being used and the action needs to be recorded multiple times needs to be carefully thought out in terms of where the cut is going to be made and how it will still look like one smooth motion even though they are two different takes.
Excellent work. I really enjoyed the video and reading through all your notes, I’ll post my comment from the Facebook group here too
I really enjoyed watching it, I loved the cameo of Kestrel, my sister loves being in the films too smile emoticon And the shot of the drink from below is brilliant. I agree that it would have been good to have a longer shot of the actor lying on the floor. On a completely un film related note, me and my Mum love your kitchen!
Thanks Chloe. It’s funny how the simplest shot of all – the man lying on the floor – is the one that I did not get enough footage of! Oh well, it’s a learning experience.
Well done on this film. You can see the planning put into it, the shot choices, the angles. It’s a very well executed exercise.
I think you are right about the length of the opening shot, but then how long is too long, I’m sure there would be viewers who think it’s just right as is.
I think, personal feelings only, that the slight change in mood from the FPV sequence to this one has helped a lot.
Very well done overall.
Thanks Paul for the comments. I’m also glad I changed the mood for this sequence,, it seems to be more consistent in its message. You right about spending time planning – it made a big difference, not only to the end product but also to the speed at which we completed the filming. Also, with better planning my actor didn’t get too annoyed at having to do the same thing too many times 🙂